Are you tired of spending countless hours working on a project in Cinema 4D, only to find out that your efficiency could have been greatly improved? Look no further than these 8 tips to help you unlock your full potential in Cinema 4D. Whether you’re a beginner or a seasoned pro, these tips will help you work smarter, not harder, and achieve better results in less time. From optimizing your workflow to utilizing hidden features, read on to learn how you can take your Cinema 4D skills to the next level.
Potential in Cinema 4D – Make use of traffic lights
Cinema 4D is widely used in the 3D industry, and for good reason. Although other packages have similar features, including motion graphics and character animation, Cinema 4D has one of the lowest learning curves among the top 3D software available. The Cinema 4D interface is simple and user-friendly, providing helpful tools such as the object list and the easy-to-use ‘traffic light’ system. With the traffic lights, artists can see the visibility of an object and the materials, plug-ins, and tags applied to it. Objects can be hidden and unhidden quickly, which makes working on complex scenes more efficient.

Configure Cinema 4D’s UI
Customizing the Cinema 4D interface can significantly improve your workflow and make working with the software more intuitive. By modifying and configuring the layout of your Cinema 4D UI, you can tailor it to specific tasks, such as animation or modeling, and make it more efficient for your specific needs.
To access the layouts, go to the ‘Layout’ drop-down menu in the top-right of the UI. From there, you can drag, lock, and add palettes to tabs as needed. You can also right-click on any part of the UI to resize and drag elements. Or use the ‘Window>Customization’ menu to access more options for configuring the UI.
Once you’ve created a custom layout that works for you, you can save it by going to the‘Window>Customization>Save Layout as… And even set it as the startup layout with ‘Window>Customization>Save as Startup Layout’ so that Cinema 4D opens directly to your preferred interface.
Get to grips with the camera
When working in Cinema 4D, it’s important to remember to use the ‘Default Camera’ rather than the ‘scene’ camera when modeling. If you accidentally use the wrong camera, you can’t simply undo the action by using the ‘Undo’ command. Instead, you must use ‘Edit>Undo (Action)’ or Shift-Z to revert the camera to its previous position.
Once you’ve got the right camera in place, you can use a range of tags to add movement options. The ‘Camera Crane’ tag can simulate the movement of a camera on a film set. While the ‘Motion Camera’ tag can add a range of movement options to a camera. Additionally, the ‘Camera Morph’ tag can be used to move a camera between the positions of other static cameras, making it a powerful tool for framing specific parts of a scene.
Potential in Cinema 4D – Create complex objects with Volume Modeling
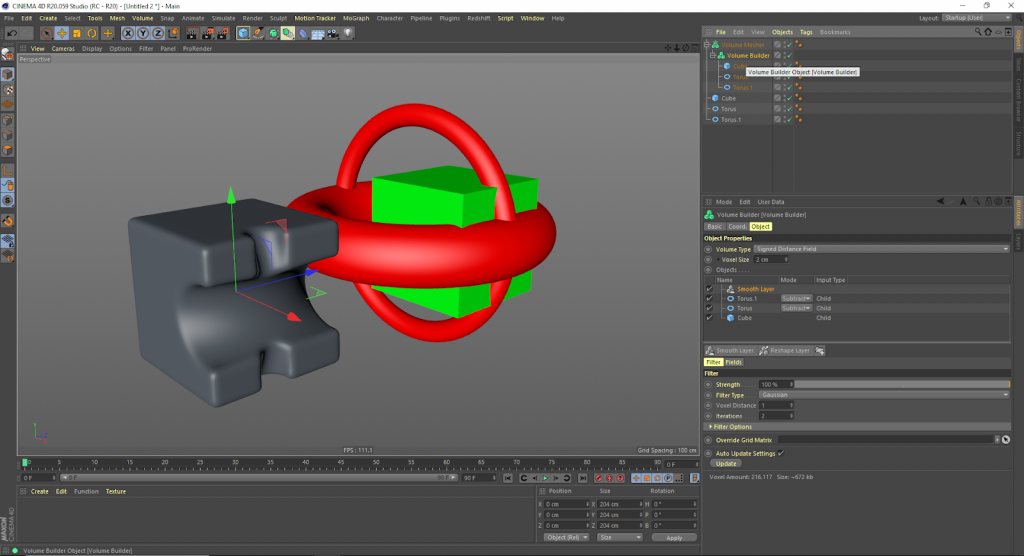
Cinema 4D R20 introduced the Volume Modeling toolset, a standout feature that allows any object in the program to become a volume. This allows artists to create complex shapes quickly and easily by mixing volumes with other shapes using addition, subtraction, and intersection.
To make an object a volume, simply add a “Volume Builder” object and make the mesh a child of it. Adjust the voxel size to suit the required features and viewport speed. Then add more meshes as children of the Volume Builder. Use the attributes palette to decide if they should be Union or Subtraction objects. Add a Smoother modifier to refine the object, and then make the Volume Builder the child of a Volume Mesher object to create the new mesh. This workflow also works with Cinema 4D’s animation systems like MoGraph and X-Particles.
Increase efficiency with Takes
Takes are an essential feature of Cinema 4D, allowing artists to create multiple instances of a scene without having to save multiple files. To create a new Take, use the ‘Takes’ Palette, select a parameter that you want to change in the attributes panel, and right-click to make it active and editable. Takes can be used to change materials, animations, camera, and render settings. And you can create a series of stills from multiple cameras of different sizes. To select specific Takes, click on the circle next to the Take name and choose ‘Render>Takes>Render Marked Takes’.
Using the After Effects camera
Cinema 4D and Adobe After Effects work well together. Users can open Cinema 4D files directly within After Effects using the Cineware format. However, certain complex camera setups, such as using the Camera Morph Tag, do not always translate accurately.
To work around this, users can use the ‘Bake Object’ feature in the Timeline menu. Simply select the camera and Camera Morph Tag, then choose ‘Functions > Bake Objects’ and select all tick boxes. Wait for Cinema 4D to create a new camera with the motion baked in. This process may take a few minutes, and a progress bar in the bottom left of the screen will keep track of progress.
Multiple computers = multiple ways to work
Cinema 4D’s cross-platform compatibility is one of its standout features. With a single license, artists can easily switch between their machines, whether they’re working on a PC desktop or a MacBook. Maxon’s compatibility with the new Mac Pro was even highlighted at the Apple WWDC. This feature can be particularly useful for artists on the go.
Another way to improve efficiency is by using Potential in Cinema 4D network rendering solution, Team Render. With Team Render, artists can link multiple machines together to create a render farm, allowing them to render scenes and animations much faster than on a single computer.
Connect with 3S Cloud Render Farm
Of course! I’d love to recommend something that I think might be useful for you. Have you heard of 3S Cloud Render Farm? They’re a great option for anyone looking to optimize their rendering times in Cinema 4D. With their cloud-based rendering solution, you can render your scenes and animations much more quickly than you could on a single machine. It’s worth considering if you’re looking to unlock your full potential in Cinema 4D. Check them out at https://3sfarm.com/ if you’re interested!