Rendering is one of the most important and final steps in which you can export a finished product to work in Blender. In today’s article, 3S Cloud Render Farm will introduce you to the steps and basic information so you can easily Blender render images and animations.
How to Blender render images
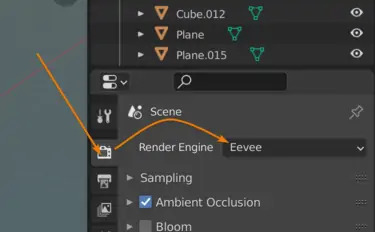
In Blender, pressing F12 will start rendering quickly. We can choose the renderer we want in the Render Settings tab in the properties panel. Go to the camera icon in the properties panel, find the Render Engine drop-down menu, and select Cycles or Eevee.

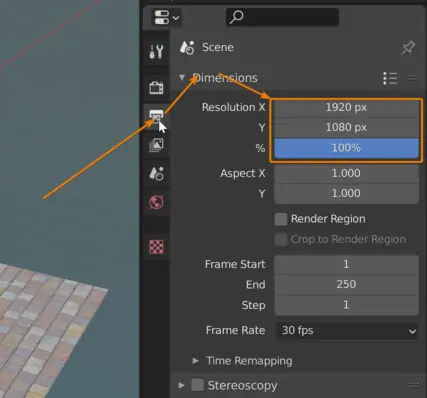
After that, we should check out the Output properties tab below the Render settings tab. We will find the Dimensions section here where we can set the render resolution.

When rendering starts, an image editor will pop up showing us the rendering progress. Once done, we can save the rendered image by pressing Alt + S or by going to the image menu to select “Save” or “Save as”.
By default, the PNG file format is selected, but if we want to save the raw image, use OpenEXR. In addition to supporting high dynamic range, this file format can support multiple layers as well.
Here are all the basic steps to making Blender Render Images.
How to render animation in Blender
To render animation in Blender, we press Ctrl + F12 or go to the render menu and press “Render animation”.
To render animation in Blender, we press Ctrl + F12 or go to render menu and press “Render animation”
On the Output Properties tab, just below Render Settings, we can place this folder in the output section. Here we can choose the output folder as well as the file format.
By default, the output directory is /tmp/, which is equivalent to C:\tmp on Windows.

Next, we need to choose a file format. We can choose an image format, for example PNG. In this case Blender stores each frame as its own image file, and if an error occurs during rendering, we can render from the last successful frame instead of having to render the whole thing. animation.
We can also choose a movie format like FFMPEG Video. In this case Blender will render each frame directly to a movie file, but we can’t continue rendering if an error occurs during rendering.
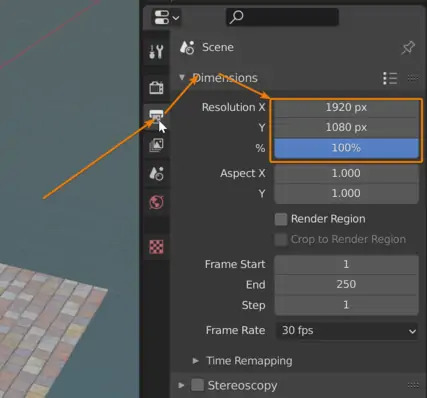
Go to the Dimensions section in the output properties, we can also set the resolution and frame settings.
When rendering an animation, the visual editor will pop up and show us the progress frame by frame until all frames are finished rendering.
A simple way to get started with animation in Blender is to animate the camera movement through your scene.
How to preview your render in Blender
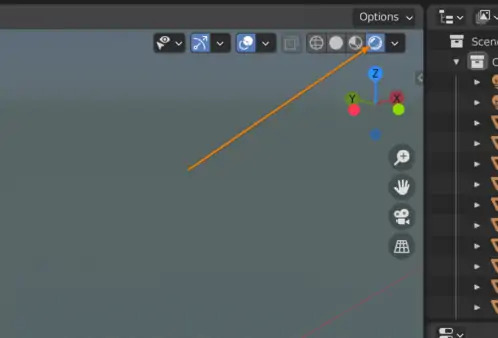
To preview your render in the viewport, you can press the render preview shader button in the top right corner of the 3D viewport.
This will change the viewport to display with the currently selected render engine.

If your render is too slow, you can press Ctrl + B and draw a box to render only that area of the viewport. Use Ctrl + B again to draw a new box if you want, or press Alt + Ctrl + B to remove the render border.
Remember that the render border persists until the final render, so remove it before rendering the final image or animation.
3S Cloud Render Farm – The Best Blender Cloud Rendering
3S Cloud Render Farm is known as a GPU Accelerated Cloud Rendering Service that provides high performance computing with the latest GPUs on the market today. The difference between 3S Farm and other Farms is in updating to the latest versions suitable for each job, besides here there is also support from a 24/7 technical team that constantly updates.
With all the outstanding advantages mentioned above, you must have found yourself the perfect choice for a blender. We provide unmatched support tailored to your specific needs and goals. In addition, every month we always offer SPECIAL OFFERS for all registered users. Let’s check it out at Pricing! For more advice and support, please do not hesitate to reach us via 3sfarm.com.
