Blender is a powerful tool for animation, allowing users to bring their 3D models to life with smooth movements and realistic motion. Whether you’re animating characters, objects, or camera movements, understanding keyframes and motion paths is essential for creating fluid animations. In this guide, we’ll explore the fundamentals of animation in Blender and provide tips to enhance your workflow.
Understanding Keyframes in Blender
Keyframes are the foundation of animation in Blender. They define an object’s properties (such as position, rotation, or scale) at specific points in time. Blender then interpolates the motion between these keyframes, creating smooth transitions.
How to Add Keyframes in Blender
- Select an Object – Choose the object you want to animate.
- Move to a Specific Frame – Use the timeline at the bottom of the screen to navigate to a frame.
- Set a Property to Animate – Press
Ito bring up the Insert Keyframe Menu. - Choose a Keyframe Type – Select the property you want to animate (e.g., Location, Rotation, Scale, or a combination).
- Adjust the Object – Move to a different frame and change the object’s position, rotation, or other properties.
- Insert Another Keyframe – Press
Iagain to create a second keyframe. Blender will animate the transition between these keyframes.
Editing Keyframes in the Graph Editor
Blender’s Graph Editor provides precise control over keyframes and interpolation. Here’s how to use it:
- Open the Graph Editor from the top-left panel.
- Select an animated object and view its animation curves.
- Adjust keyframes manually by dragging them to fine-tune motion.
- Change interpolation modes (e.g., Linear, Bezier, or Constant) to control how Blender transitions between keyframes.
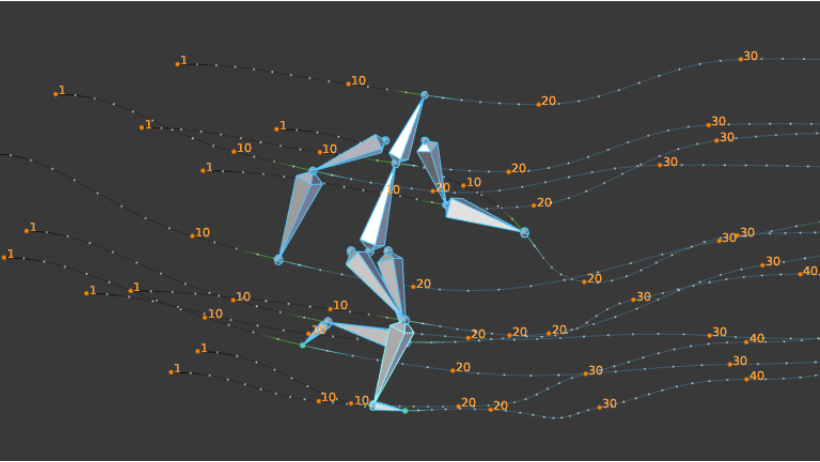
Working with Motion Paths
Motion paths help visualize how an object moves over time. They provide a reference for tweaking animations to ensure smooth and natural movement.
How to Enable Motion Paths in Blender
- Select Your Animated Object.
- Go to Object Properties and find the Motion Paths panel.
- Click “Calculate” to generate a motion path based on the existing keyframes.
- Adjust Motion Path Settings to customize the number of frames displayed before and after the current frame.
Using motion paths allows you to refine animations, ensuring objects move realistically and naturally.
>>> Read more: Exploring the VFX Production Process at 3S Cloud Render Farm
Tips for Creating Smooth Animations
- Use Ease In and Ease Out – Avoid sudden movements by adjusting interpolation curves in the Graph Editor.
- Follow Real-World Physics – Objects should accelerate and decelerate naturally for realism.
- Break Down Complex Animations – Use secondary animations to add depth, such as subtle movements in a character’s arms while walking.
- Test Your Animation – Play the animation at different speeds to identify inconsistencies.
- Use Onion Skinning for Frame-by-Frame Animation – This helps when animating objects that require detailed adjustments.
Enhance Your Workflow with 3S Cloud Render Farm
Rendering animations can be time-consuming, especially for complex scenes. That’s where 3S Cloud Render Farm comes in. It provides high-speed, cloud-based rendering to significantly reduce waiting times, allowing you to focus on refining your animation.
Why Choose 3S Cloud Render Farm?
- Faster Rendering – Leverage powerful cloud GPUs for quick results.
- Seamless Blender Integration – Supports Blender’s Cycles and Eevee render engines.
- Cost-Effective Solutions – Pay only for the resources you use.
>>> Read more: Top Blender Add-ons to Supercharge Your Workflow
Conclusion
Mastering keyframes and motion paths is essential for animating in Blender. By understanding how to set keyframes, use the Graph Editor, and refine motion with motion paths, you can create professional-quality animations. And when it’s time to render, 3S Cloud Render Farm ensures fast, efficient, and cost-effective results.